CRUD Laravel 9 Vue 3 usando Vite
En este tutorial aprenderás cómo crear un CRUD en Laravel 9 y Vue 3 usando el gestor de frontend Vite el cual es el sustituto de WebPack, ahora Laravel desde la versión 9.19.0 integra Vite de forma nativa. Sin más, manos a la obra.
Requisitos previos
- Entorno de desarrollo como XAMPP, Wamp o Laragon.
- Composer instalado de manera global en el SO.
- Contar con Node.
1. Crear un nuevo proyecto Laravel 9 y Vue 3
Desde la terminal de comandos ve a la raíz de tu entorno de desarrollo y ejecuta la instrucción:
composer create-project laravel/laravel crud-laravel-9-vue-3-vite
cd crud-laravel-9-vue-3-vite
2. Instalar Laravel Breeze
Instala el sistema de autenticación Laravel Breeze corriendo en la terminal uno a uno los siguientes comandos:
composer require laravel/breeze --dev
php artisan breeze:install
php artisan breeze:install vue
npm install && npm run dev
Abre otra terminal en la raíz de tu proyecto y enciende el servidor integrado de artisan:
php artisan serve
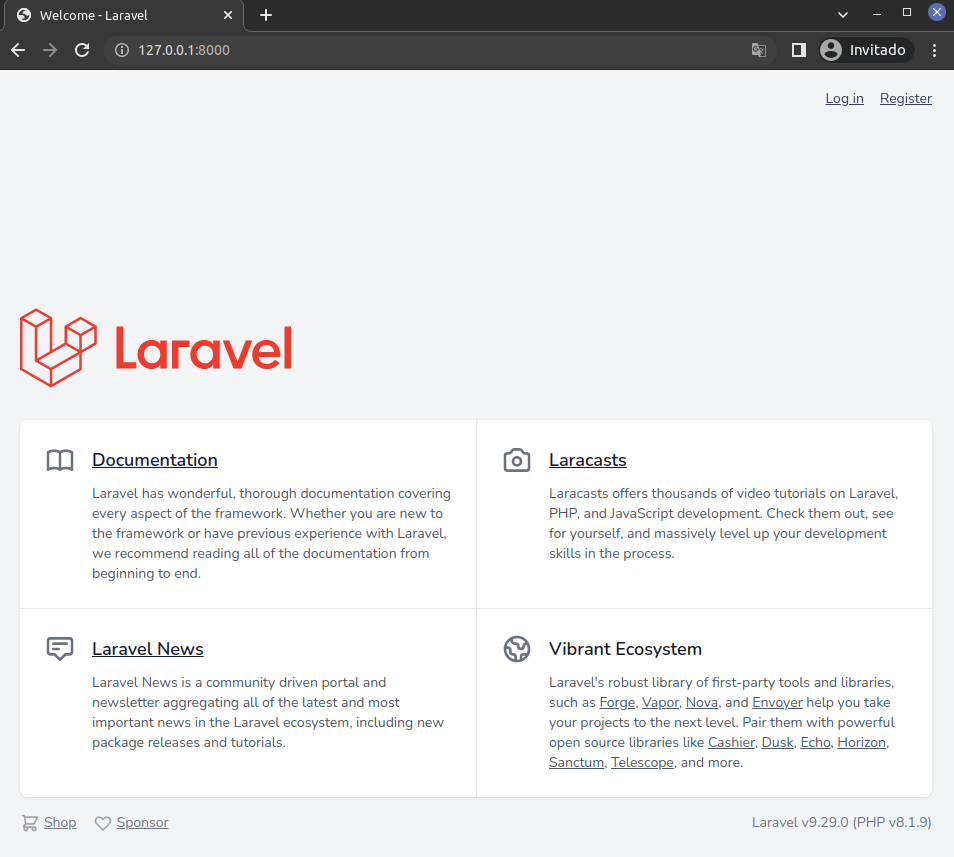
En tu navegador web ve a la dirección http://127.0.0.1:8000/ verás la pantalla de inicio de Laravel con autenticación:
3. Crear y configurar base de datos
Para crear una nueva base de datos para tu proyecto abre la consola de MySQL escribiendo en la terminal la siguiente instrucción e ingresando tus credenciales:
mysql -u root -p
Crea una base de datos nueva:
CREATE DATABASE crud_laravel_vue_vite CHARACTER SET utf8 COLLATE utf8_spanish_ci;

exit
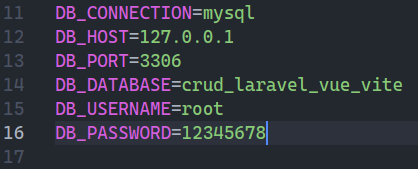
Configura la conexión a la nueva base de datos abriendo con tu editor de textos el archivo .env que se encuentra en la raíz del proyecto y agrega los datos:
4. Crear modelo, migración y controlador
Para este tutorial crearé un modelo llamado Book con su migración y controlador para ello ejecuta en la terminal la siguiente instrucción:
php artisan make:model Book -mcr
5. Configurar archivo de migración
Con tu editor de textos abre el archivo database/migrations/…create_books_table.php y agrega los campos \’title\’, \’autor\’ y \’review\’, la tabla debe quedar así:
Schema::create(\'books\', function (Blueprint $table) {
   $table->id();
   $table->string(\'title\');
   $table->string(\'autor\');
   $table->text(\'review\');
   $table->timestamps();
});
Para correr las migraciones en la terminal de comandos ejecuta el comando:
php artisan migrate
6. Configuración archivo de modelo
Abre el archivo app/Models/Book y para habilitar la asignación masiva agrega la siguiente línea de código:
protected $fillable = [\'title\', \'autor\', \'review\'];
7. Configurar los métodos del controlador
Abre el archivo app/Http/Controllers/BookController.php y en cada método agrega su respectivo código:
Al inicio del archivo importa la clase Inertia:
use Inertia\Inertia;
7.1. Método index
public function index()
{
   $books = Book::all();

   return Inertia::render(
      \'Books/Index\',
      [
         \'books\' => $books
      ]
   );
}
7.2. Método create
public function create()
{
   return Inertia::render(
      \'Books/Create\'
   );
}
7.3. Método store
public function store(Request $request)
{
   $request->validate([
      \'title\' => \'required\',
      \'autor\' => \'required\',
      \'review\' => \'required\'
   ]);

   Book::create([
      \'title\' => $request->title,
      \'autor\' => $request->autor,
      \'review\' => $request->review
   ]);
   sleep(1);

   return redirect()->route(\'books.index\')->with(\'message\', \'Book Created Succesfully\');

}
7.4. Método edit
public function edit(Book $book)
{
   return Inertia::render(
      \'Books/Edit\',
      [
         \'book\' => $book
      ]
   );
}
7.5. Método update
public function update(Request $request, Book $book)
{
   $request->validate([
      \'title\' => \'required\',
      \'autor\' => \'required\',
      \'review\' => \'required\'
   ]);

   $book->title = $request->title;
   $book->autor = $request->autor;
   $book->review = $request->review;
   $book->save();
   sleep(1);

   return redirect()->route(\'books.index\')->with(\'message\', \'Book Updated Successfully\');
}
7.6. Método destroy
public function destroy(Book $book)
{
   $book->delete();
   sleep(1);

   return redirect()->route(\'books.index\')->with(\'message\', \'Book Delete Successfully\');
}
8. Crear rutas
Con tu editor de código abre el archivo routes/web.php y en el inicio del archivo importa el controlador BookController:
use App\Http\Controllers\BookController;
Para crear las rutas agrega la siguiente línea de código:
Route::resource(\'books\', BookController::class);
9. Crear archivos de Vue 3
Con tu editor de texto crea la carpeta resources/js/Pages/Books y dentro de ella vas a crear los archivos que serán las vistas en Vue: Index.vue, Create.vue y Edit.vue.
9.1. Configurar Index.vue
<script setup>
    import BreezeAuthenticatedLayout from "@/Layouts/AuthenticatedLayout.vue";
    import { Head } from "@inertiajs/inertia-vue3";
    import BreezeButton from "@/Components/PrimaryButton.vue";
    import { Link } from "@inertiajs/inertia-vue3";
    import { Inertia } from "@inertiajs/inertia";
    import { useForm } from \'@inertiajs/inertia-vue3\'

    const props = defineProps({
        books: {
            type: Object,
            default: () => ({}),
        },
    });
    const form = useForm();

    function destroy(id) {
        if (confirm("Are you sure you want to Delete")) {
            form.delete(route(\'books.destroy\', id));
        }
    }
    </script>

    <template>

      <Head title="Books" />

    <BreezeAuthenticatedLayout>
            <template #header>
                <h2 class="text-xl font-semibold leading-tight text-gray-800">
                    Books Index
                </h2>
            </template>

            <div class="py-12">
                <div class="mx-auto max-w-7xl sm:px-6 lg:px-8">
                    <!-- <div
                        v-if="$page.props.flash.message"
                        class="p-4 mb-4 text-sm text-green-700 bg-green-100 rounded-lg dark:bg-green-200 dark:text-green-800"
                        role="alert"
                    >
                        <span class="font-medium">
                            {{ $page.props.flash.message }}
                        </span>
                    </div> -->
                    <div class="overflow-hidden bg-white shadow-sm sm:rounded-lg">
                        <div class="p-6 bg-white border-b border-gray-200">
                           <div class="mb-2">
                                <Link :href="route(\'books.create\')">
                                    <BreezeButton>Add Book</BreezeButton></Link
                                >
                            </div>
                             <div
                                class="relative overflow-x-auto shadow-md sm:rounded-lg"
                            >
                                <table
                                    class="w-full text-sm text-left text-gray-500 dark:text-gray-400"
                                >
                                    <thead
                                        class="text-xs text-gray-700 uppercase bg-gray-50 dark:bg-gray-700 dark:text-gray-400"
                                    >
                                        <tr>
                                            <th scope="col" class="px-6 py-3">#</th>
                                            <th scope="col" class="px-6 py-3">
                                                Title
                                            </th>
                                            <th scope="col" class="px-6 py-3">
                                                Autor
                                            </th>
                                            <th scope="col" class="px-6 py-3">
                                                Edit
                                            </th>
                                            <th scope="col" class="px-6 py-3">
                                                Delete
                                            </th>
                                        </tr>
                                    </thead>
                                    <tbody>
                                        <tr
                                            v-for="book in books"
                                            :key="book.id"
                                            class="bg-white border-b dark:bg-gray-800 dark:border-gray-700"
                                        >
                                            <th
                                                scope="row"
                                                class="px-6 py-4 font-medium text-gray-900 dark:text-white whitespace-nowrap"
                                            >
                                                {{ book.id }}
                                            </th>
                                            <th
                                                scope="row"
                                                class="px-6 py-4 font-medium text-gray-900 dark:text-white whitespace-nowrap"
                                            >
                                                {{ book.title }}
                                            </th>
                                            <td class="px-6 py-4">
                                                {{ book.autor }}
                                            </td>


                                            <td class="px-6 py-4">
                                                <Link
                                                    :href="
                                                        route(
                                                            \'books.edit\',
                                                            book.id
                                                        )
                                                    "
                                                   class="px-4 py-2 text-white bg-blue-600 rounded-lg" >Edit</Link
                                                >
                                            </td>
                                            <td class="px-6 py-4">
                                                <BreezeButton
                                                    class="bg-red-700"
                                                    @click="destroy(book.id)"
                                                >
                                                    Delete
                                                </BreezeButton>
                                            </td>
                                        </tr>
                                    </tbody>
                                </table>
                            </div>
                        </div>
                    </div>
                </div>
            </div>


        </BreezeAuthenticatedLayout>
    </template>
9.2. Configurar Create.vue
<script setup>
    import BreezeAuthenticatedLayout from "@/Layouts/AuthenticatedLayout.vue";
    import { Head } from "@inertiajs/inertia-vue3";
    import BreezeButton from "@/Components/PrimaryButton.vue";
    import { Link } from "@inertiajs/inertia-vue3";
    import { useForm } from "@inertiajs/inertia-vue3";

    const props = defineProps({
        books: {
            type: Object,
            default: () => ({}),
        },
    });


    const form = useForm({
        title: \'\',
        autor: \'\',
        review: \'\',

    });

    const submit = () => {
        form.post(route("books.store"));
    };
    </script>

    <template>
        <Head title="Book Create" />

        <BreezeAuthenticatedLayout>
            <template #header>
                <h2 class="text-xl font-semibold leading-tight text-gray-800">
                    Book Create
                </h2>
            </template>

            <div class="py-12">
                <div class="mx-auto max-w-7xl sm:px-6 lg:px-8">
                    <div class="overflow-hidden bg-white shadow-sm sm:rounded-lg">
                        <div class="p-6 bg-white border-b border-gray-200">
                            <form @submit.prevent="submit">
                                <div class="mb-6">
                                    <label
                                        for="Title"
                                        class="block mb-2 text-sm font-medium text-gray-900 dark:text-gray-300"
                                        >Title</label
                                    >
                                    <input
                                        type="text"
                                        v-model="form.title"
                                        name="title"
                                        class="bg-gray-50 border border-gray-300 text-gray-900 text-sm rounded-lg focus:ring-blue-500 focus:border-blue-500 block w-full p-2.5"
                                        placeholder=""
                                    />
                                    <div
                                        v-if="form.errors.title"
                                        class="text-sm text-red-600"
                                    >
                                        {{ form.errors.title }}
                                    </div>
                                </div>
                                <div class="mb-6">
                                    <label
                                        for="Autor"
                                        class="block mb-2 text-sm font-medium text-gray-900 dark:text-gray-300"
                                        >Autor</label
                                    >
                                    <input
                                        type="text"
                                        v-model="form.autor"
                                        name="autor"
                                        class="bg-gray-50 border border-gray-300 text-gray-900 text-sm rounded-lg focus:ring-blue-500 focus:border-blue-500 block w-full p-2.5"
                                        placeholder=""
                                    />
                                    <div
                                        v-if="form.errors.autor"
                                        class="text-sm text-red-600"
                                    >
                                        {{ form.errors.autor }}
                                    </div>
                                </div>
                                <div class="mb-6">
                                    <label
                                        for="review"
                                        class="block mb-2 text-sm font-medium text-gray-900 dark:text-gray-300"
                                        >Review</label
                                    >
                                    <textarea
                                        type="text"
                                        v-model="form.review"
                                        name="review"
                                        id=""
                                        class="bg-gray-50 border border-gray-300 text-gray-900 text-sm rounded-lg focus:ring-blue-500 focus:border-blue-500 block w-full p-2.5"
                                    ></textarea>

                                    <div
                                        v-if="form.errors.review"
                                        class="text-sm text-red-600"
                                    >
                                        {{ form.errors.review }}
                                    </div>
                                </div>
                                <button
                                    type="submit"
                                    class="text-white bg-blue-700  focus:outline-none  font-medium rounded-lg text-sm px-5 py-2.5 "
                                    :disabled="form.processing"
                                    :class="{ \'opacity-25\': form.processing }"
                                >
                                    Submit
                                </button>
                            </form>
                        </div>
                    </div>
                </div>
            </div>
        </BreezeAuthenticatedLayout>
    </template>
9.3. Configurar Edit.vue
<script setup>
    import BreezeAuthenticatedLayout from "@/Layouts/AuthenticatedLayout.vue";
    import { Head } from "@inertiajs/inertia-vue3";
    import BreezeButton from "@/Components/PrimaryButton.vue";
    import { Link } from "@inertiajs/inertia-vue3";
    import { useForm } from "@inertiajs/inertia-vue3";

    const props = defineProps({
        book: {
            type: Object,
            default: () => ({}),
        },
    });

    const form = useForm({
        id: props.book.id,
        title: props.book.title,
        autor: props.book.autor,
        review: props.book.review,
    });


    const submit = () => {
        form.put(route("books.update", props.book.id));
    };
    </script>

    <template>
        <Head title="Book Edit" />

        <BreezeAuthenticatedLayout>
            <template #header>
                <h2 class="text-xl font-semibold leading-tight text-gray-800">
                    Book Edit
                </h2>
            </template>

            <div class="py-12">
                <div class="mx-auto max-w-7xl sm:px-6 lg:px-8">
                    <div class="overflow-hidden bg-white shadow-sm sm:rounded-lg">
                        <div class="p-6 bg-white border-b border-gray-200">
                            <form @submit.prevent="submit">
                                <div class="mb-6">
                                    <label
                                        for="Title"
                                        class="block mb-2 text-sm font-medium text-gray-900 dark:text-gray-300"
                                        >Title</label
                                    >
                                    <input
                                        type="text"
                                        v-model="form.title"
                                        name="title"
                                        class="bg-gray-50 border border-gray-300 text-gray-900 text-sm rounded-lg focus:ring-blue-500 focus:border-blue-500 block w-full p-2.5"
                                        placeholder=""
                                    />
                                    <div
                                        v-if="form.errors.title"
                                        class="text-sm text-red-600"
                                    >
                                        {{ form.errors.title }}
                                    </div>
                                </div>
                                <div class="mb-6">
                                    <label
                                        for="Autor"
                                        class="block mb-2 text-sm font-medium text-gray-900 dark:text-gray-300"
                                        >Autor</label
                                    >
                                    <input
                                        type="text"
                                        v-model="form.autor"
                                        name="autor"
                                        class="bg-gray-50 border border-gray-300 text-gray-900 text-sm rounded-lg focus:ring-blue-500 focus:border-blue-500 block w-full p-2.5"
                                        placeholder=""
                                    />
                                    <div
                                        v-if="form.errors.autor"
                                        class="text-sm text-red-600"
                                    >
                                        {{ form.errors.autor }}
                                    </div>
                                </div>
                                <div class="mb-6">
                                    <label
                                        for="review"
                                        class="block mb-2 text-sm font-medium text-gray-900 dark:text-gray-300"
                                        >Review</label
                                    >
                                    <textarea
                                        type="text"
                                        v-model="form.review"
                                        name="review"
                                        id=""
                                        class="bg-gray-50 border border-gray-300 text-gray-900 text-sm rounded-lg focus:ring-blue-500 focus:border-blue-500 block w-full p-2.5"
                                    ></textarea>

                                    <div
                                        v-if="form.errors.review"
                                        class="text-sm text-red-600"
                                    >
                                        {{ form.errors.review }}
                                    </div>
                                </div>
                                <button
                                    type="submit"
                                    class="text-white bg-blue-700  focus:outline-none  font-medium rounded-lg text-sm px-5 py-2.5 "
                                    :disabled="form.processing"
                                    :class="{ \'opacity-25\': form.processing }"
                                >
                                    Submit
                                </button>
                            </form>
                        </div>
                    </div>
                </div>
            </div>
        </BreezeAuthenticatedLayout>
    </template>
9.4. Agregar elemento al menú
Abre el archivo resources/js/Layouts/AuthenticatedLayout.vue busca la sección \’Navigation Links\’ y agrega el siguiente trozo de código:
<div class="hidden space-x-8 sm:-my-px sm:ml-10 sm:flex">
   <NavLink :href="route(\'books.index\')" :active="route().current(\'books.index\')">
      Books
   </NavLink>
</div>

10. Probar CRUD en Laravel 9 y Vue 3
Para probar tu CRUD en Laravel 9 y Vue 3 usando Vite, tienes que abrir dos terminales de comando en la raíz del proyecto. En la primer terminal corre el comando:
npm i && npm run dev
En la segunda terminal ejecuta la instrucción:
php artisan serve
Ahora en el navegador web ve a la dirección http://localhost:8000/ y registrate, cuando ingreses en el Dashboard ve al menú Books:
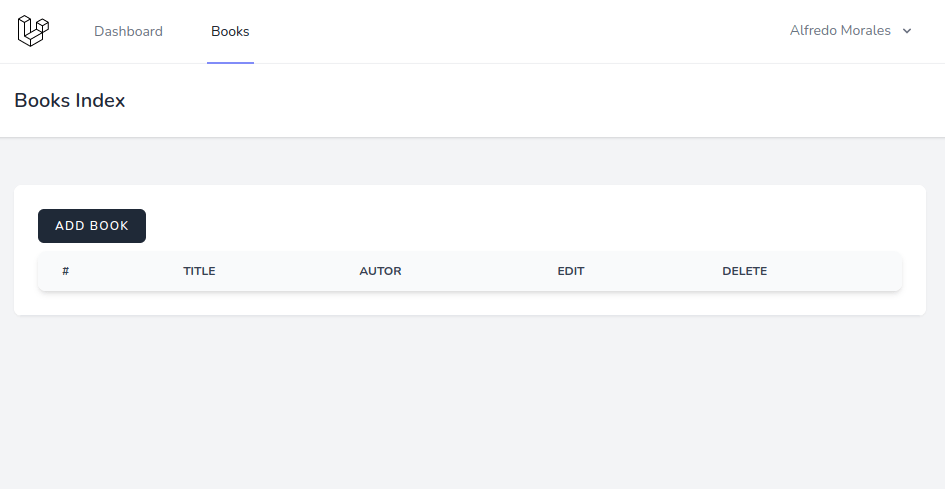
Ya puedes hacer uso del CRUD, puedes agregar libros, editarlos y borrarlos.
Conclusión
En este tutorial aprendiste a crear un CRUD en Laravel 9 y Vue 3 usando Vite, estas bases te pueden servir para futuros proyectos. Si te ha servido el tutorial te invito a compartirlo en tus redes sociales para llegar a más personas y si tienes dudas o comentarios déjalos en la caja de comentarios, estaré al pendiente de ellos. Saludos!
Repositorio GitHub del tutorial.
Te puede interesar: CRUD con Laravel 9 y React.
Referencias:
Vite se integra de forma nativa a Laravel.
Vite documentación.